Wednesday, March 25, 2026
Home Blog Page 5

Can I make money with my Tractor?

We get lots of questions concerning the possibility of using a sub-compact tractor like a Deere 1-series, or a Kubota BX to do custom project work for others. Usually, folks are saying that they aren’t really interested in doing this full-time, rather they want to “make some money on the side” in order to make the payments on their new toy.

In this article, we will investigate some questions which you should work through before you decide to go with this approach.

Will you make enough money to make it worthwhile?

Many projects (like tilling) are viewed as relatively simply jobs by most folks. They reason that they can buy a tiller for ~$500 or rent one for $50 or so to till their garden. They won’t be willing or able to pay a huge amount to have their garden tilled.

More broadly, the “rental equipment” market has a huge influence on the pricing. Most folks that we help are DIY type folks. They are evaluating our services against renting the equipment themselves.

Also, loading/unloading and transport take lots of time. Adding all of this together contributes to a relatively low hourly rate for your work.

Do You Have Sufficient Experience?

Using your tractor on personal projects around your property can be incredibly fun and rewarding. You can go at your own pace, learning as you go without severe time or financial commitments to finishing the project.

Working for hire is different. The client expects that you already know what you are doing. They expect that you will make the correct (optimal) decision for each situation you encounter.
They expect the project to be done right, and to be done efficiently.

Christy and I both grew up on farms, doing the type of work we do now on a daily basis during all of those growing up years. I can’t say how long it would take to gain that same experience starting from scratch, nor can we readily share all of that experience with you via YouTube. Much of it must be learned by making mistakes, or trial and error. There just isn’t much room for error on a customer’s site.

It is important for you, and for the rest of the tractor community for you to have the appropriate experience before considering doing work for hire.

Do you have the right equipment for the job?

I’ve often commented that a sub-compact tractor is a wonderful compromise. It will do MANY different things well. That is a tremendous advantage for the property owner. You can buy one piece of equipment and handle many different types of projects. However, when doing work for hire, the sub-compact tractor might not be as fast, or as optimal for the job as some other piece of equipment. A good example of this is the backhoe. A Mini-excavator is a much better digger than a sub-compact backhoe. No worries for home projects, but when doing work for hire, are you really being fair to the client by making them pay high rates for less than optimal equipment?

More directly, do you have a trailer? Do you have a suitable tow vehicle? If you don’t need these for your own projects, this additional cost will make it even harder for you to make a profit on your work.

Are you prepared for the business aspects?

There are several more questions which I will ask, but not answer in this article. You will need to think about them for yourself.

  • Are you appropriately insured?
  • How will you handle a situation where a customer is unsatisfied?
  • Do you really have the time to do the work, especially on the customer’s schedule?
  • Will you be able to keep this going, or is this simply a way to justify the expense of a tractor to the finance committee?

Summary

Like lots of other scenarios, at first this seems like ‘easy money’. It seems like the perfect answer, providing a way for you to get your long desired new toy. However, the old saying “there is no such thing as a free lunch” definitely applies here.

Enjoy the video associated with this article:

My Yard is Too small for My Tractor

8

We often tease about having too much tractor for our “less than 1/2 acre” property.

Obviously, we don’t need our 1025R on our property, but hey, we get a lot of fun out of it!

We love both of these commercials, illustrating the same absurdity. Enjoy!

…plows your garden in 4.5 seconds!

John Deere 260B Backhoe for 1-Series Tractors

John Deere Introduces Improved Backhoe and Loader for Compact Utility Tractors

New 260B Backhoe and 120R Loader increase operator productivity

CARY, N.C. (June 16, 2017) John Deere continues to evolve its expansive line of compact utility tractor implements with two additions, the 260B Backhoe and 120R Loader. Building upon previous models, the new implement offerings feature improvements that offer operators the power and productivity needed to get a variety of jobs done.
 John Deere 260B Backhoe
“When designing our latest backhoe and loader models, we listened to customer feedback, making key changes to improve operator ease and productivity,” said DeMark Cole, Product Specialist for Compact Utility Tractors. “The 260B and 120R retain the features that customers loved from previous models, and include updates to simplify tasks, including implement attachment and detachment, and routine maintenance.”


Compatible with the mid-2017 1023E and 1025R models, the 260B Backhoe is equipped with a dedicated high-back seat, opposed to the swivel tractor seat, a new ROPS-mounted grab handle, and integrated step on the stabilizer arm. The controls now feature protective rubber boots, and a large, easy-to-read decal with installation and removal instructions. The 260B features a cushioned boom cylinder for smoother operation, and a new thumb kit. Additionally, integrated stabilizer locks and boom and swing lock pins are operable from the operator’s seat, and the improved backhoe lock pins simplify attaching and detaching.

Boasting 754-pound lift capacity and 72-inch lift height, the 120R Loader provides operators with a powerful tool for a variety of tasks. Compatible with the John Deere 1023E and 1025R compact utility tractor models, the 120R can tackle everything from moving dirt to carrying heavy materials like gravel. The 120R is equipped with the John Deere Quik-Park™ mounting system, which allows the operator to easily remove and mount the implement without tools. It also has a curved boom design for improved visibility and styling along with a more robust knee joint for improved durability. Additionally, end-of-pin lubrication on cylinder and pivot pins allow for easy access to servicing grease points.

To learn more about the 260B Backhoe and 120R Loader, as well as the full lineups of John Deere compact utility tractors and compatible implements, visit your local John Deere dealer or www.JohnDeere.com.

Deere 54D/60D Mid Mount Mower Belt Replacement

While mowing down our corn stalks last year, I had the brilliant idea of “backing up” over the stalks that I had just mowed over to help get them cut.    This quickly resulted in one of the stiff corn-stalks pushing the belt off the pulley.  By the time the smoke and smell had alerted me to my error, I had essentially destroyed the belt.  At that time, I decided I would put the belt back on, finish the job, and see how long it lasted.

It finally failed the other day while Christy was mowing.      I suppose I could have tried to blame her some way.  In fact, watching this video, I think you can see that she was prepared to take the blame.  …but I don’t work that way.  So, I ‘fessed up!

You can choose whether you want to watch the video before or after you read the rest of this post.  I’m placing it here (near the top) for easy access, but it might be most effective to read the post first.

First, I ordered the belt from Green Farm Parts.  Here are the links to the 54D and 60D belts:

Add 54D Belt to your Cart

Add 60D Belt to your Cart

Without really thinking about it, I assumed replacing the belt would be trivial. On smaller mowers, the belt usually needs to be removed to attach and remove the deck, so it is relatively easy to access. However, I deeper look at the 54D/60D deck made it clear that some wrenches were needed. Don’t be concerned, it is not a difficult job, but it is not trivial either.

The instruction manual for the 54D/60D deck can be found here.  For the section specifically related to servicing the mower belt, click here.   These instructions are accurate, and should provide sufficient guidance to replace the belt.  However, nothing is better than a video (at least in our opinion)!

Before we even got started, we realized that the mower didn’t smell very good.  Grass from the spring mowing season was all caked up under the deck, and it was, well, not so pleasant.  So, we decided to use the power washer to remove that unpleasantness!    During this process, we learned that the Gator blades we installed last fall really aren’t working so well with the mulch kit.

Check out this post and video to see details on the mulch specific blades.

GearWrench


In this video, we use a “GearWrench”, and discuss the two common types of gear wrenches available. As we mention in the video, both types are useful in certain situations. I’ll include links to both types here. I highly recommend getting a set of GearWrenches (maybe both the angled AND the straight ones). They are VERY handy.

The Amazon link to the left (if you don’t see it, disable any ad-blockers you have enabled) shows one of the angled sets. The link to the right shows the straight style.

Lock-n-Lube


Also, near the end of the video, we grease the mower deck. As we’ve done before, we use the Lock-n’Lube product.  This thing is amazing, and makes greasing MUCH easier.   It is rare for us to find a product which totally transforms a task like greasing.  However, the Lock-n-Lube does just that.   Once you get one of these, you’ll wonder how you ever did without it.  The link to the left is the standard Lock-n-Lube.

We also discuss the new Lock-N-Lube XL which is longer than the standard Lock-N-Lube.  The team at Lock-N-Lube sent us one of these recently, so we’ll show it to you in an upcoming video.  This version would be useful in certain situations where the handle of the original Lock-n-Lube would be in the way. We’ll demonstrate this on a future video. Meanwhile, it functions exactly like the original Lock-n-Lube other than being longer. Use the link to the right to order.

Rounding Up the Evidence on Roundup

Those of you who have seen our videos about our sweet corn will know that this year, for the first time, we’re planting corn that is resistant to glyphosate, a type of herbicide most commonly known as Roundup. Our corn is also resistant to glufosinate, which Syngenta uses as the active ingredient of their herbicide Liberty. Of course, herbicides have been highly controversial in recent years, and perhaps no herbicide is more controversial that glyphosate. These two herbicides interact differently with plants, but the generalities of both are the same. Because we’ll use Roundup in our garden, and because of it’s fame, we’ll focus on glyphosate for this article. Studies have attempted to show that glyphosate causes cancer, and others insist that glyphosate is a threat to the environment. Between my dad’s farm experience, my mom’s chemistry degree, and my biology and agriculture classes, we’ve decided that we’re alright with using glyphosate in our garden, and we’d like to share our reasoning with you. Buckle up, because we’re about to get real technical real quick.


Let’s first discuss how glyphosate works. Glyphosate inhibits the shikimic acid pathway, a chemical process in plants that helps the plant create necessary amino acids. Without these amino acids, the plant will die. Humans and animals don’t have a shikimic acid pathway. We don’t even have the ability to create these amino acids and we have to eat them in order for our body to function properly. So, if glyphosate enters your body, it really can’t do much. It isn’t very reactive with other chemicals in our bodies and essentially will exit the body in the exact chemical form it entered the body. Glyphosate isn’t easily absorbed through the skin either, so even if you would happen to spill some all over yourself, it’s unlikely that any meaningful amount would actually enter your body.


One of the largest claims about glyphosate is that it causes cancer. Most of this claim is based off a 2012 study by Seralini et. al (fancy speak for a guy named Seralini wrote it, but a lot of other people helped) in which scientists fed rats glyphosate and glyphosate resistant corn. The study was published, but eventually retracted after peer reviewers noticed some key issues with the study. The strain of rat used in the study is known to be particularly prone to cancer, meaning that a rat getting cancer during the study may simply be because of its inherent genetic predisposition to cancer rather than glyphosate. Also, the sample sizes used for each test group were too small to accurately use a lot of statistical tests. For those of you who have taken a stats class, you’ll know that certain tests and confidence intervals require minimum data set sizes, typically 30 or upwards. In this study, the sample sizes were around 10, making it difficult for accurate conclusions to be reached. Essentially, the experiment’s design didn’t live up to typical standards for scientific research. However, several of the rats developed massive tumors during the study, and several grotesque pictures were included in the paper. This is a strong emotional appeal – it makes people think that if they use or are around glyphosate, they will end up getting tumors like the rats in those pictures. Without a closer look, it’s easy to conclude that Roundup caused these tumors when that may have not necessarily been the case. Even if the tumors were a result of Roundup, one must remember that the sort of exposure these rats were getting to glyphosate is an extremely abnormally high amount. They were being fed glyphosate in their water, which if you keep reading, you’ll understand is extremely unlikely to ever occur in real life. If you’d like, you can read the original Seralini study here.


Others say that glyphosate is dangerous to the environment. One of the main concerns with herbicides is runoff from fields into rivers and lakes. Glyphosate actually does a pretty good job at binding to the soil and when applied responsibly produces little to no runoff. Typically, it just hangs out in the soil until some bacteria come and break it down into smaller, more easily digestible parts. When a plant that is treated with glyphosate dies, half of the chemical is broken down within 8-9 days. So, glyphosate is probably safer than a lot of other herbicides and chemicals when it comes to environmental safety.


There are some credible concerns about the toxicity of products containing glyphosate, but most concerns come from the other chemicals mixed in with glyphosate. Roundup, or any herbicide, is most likely not pure glyphosate, and those other chemicals may be more harmful than glyphosate is itself. Because of this, and because glyphosate is a chemical, we always make sure to treat it with extreme care and caution. While we believe that the benefits of glyphosate and glyphosate tolerant corn outweigh the costs, we still do our best to handle the chemical in a safe and responsible way.


At the end of the day, we must all remember that farmers (and gardeners like us) are in the business of creating more food safely and more efficiently. Glyphosate is a tool that has helped farmers feed millions more people and increase output while decreasing the time and effort required to weed their fields, which allows farmers to grow more food. Farmers have even more reason to be afraid of a toxic chemical than most of us – they have the highest exposure to the chemical themselves. So, while there is a lot of skepticism and fear surrounding herbicides, including glyphosate, remember that those who developed it and use it daily trust that it will not harm them or their families.


Sources:

http://npic.orst.edu/factsheets/glyphogen.html

http://www.sciencedirect.com/science/article/pii/S0278691512005637

https://www.ncbi.nlm.nih.gov/pubmed/15012217

Natural Playground – DIY Hillside Slide using Compact Tractor

9

Carmel IN –

Recently we helped construct a Hillside Slide Natural Playground. Sandi (the mom) saw the idea on Pinterest and wanted to recreate the slide in her backyard for her kids. She searched the internet for information on how to build the hill for the slide but didn’t find detailed instructions – only pictures of completed projects. Sandi’s yard does not have a natural sloped area for the slide so she needed to haul in soil to create a hill were there wasn’t one (we are in Indiana after all).  She needed Johnny’s ((John Deere 1025R) help to shape and compact the hill,  haul sod to the hill, and then till the new garden area.

Steps to Creating the Hillside Slide Natural Playground

Step 1: Purchase a slide

First you need to locate or purchase a slide. This will help you determine how much dirt you’ll need for the hill.  Sandi purchased an 80” slide.  She wanted the hill and slide area to stay interesting to her children for many years so she went with a longer slide.  Read the detailed description of the slide you choose, the height range for the top of the slide will be stated (i.e. 42″ – 52″).

The slide needs to be supported underneath inside the dirt hill. We suggest using concert blocks or treated lumber underneath the top and half-way down the slide, filling in dirt around the supports. The soil will compact over time so supporting the slide is critical. The height of your top supports will determine the steepness of the slide. Sandi’s husband, Ben, had already installed the supports under the slide before we arrived.

For the 91″ slide shown in the Amazon link here, you’ll need the dirt to be at least 42 inches high. For a steeper slide, pile the dirt up to 52 inches. Sandi first had 3 cubic yards of dirt delivered and then realized that wasn’t going to be enough. She had another 3 cubic yards brought in and a neighbor donated 3 wheelbarrows full of dirt. Once piled up in the shape of a volcano, this amount was perfect! There are many different shapes and sizes of slides so you can pick the perfect one for you hill!

If you  have a little extra time and money, it would be fun to bury a tunnel in the dirt as well. There are all sorts of items you can add to the hill: stepping stones, pole with a rope to pull yourself up, plants, you name it. Kids can play “King of the Mountain” and use their imagination for all sorts of outdoor fun.


Step 2: Shaping and Compacting the Soil

If you can, have the dirt dumped in an area close to where you would like the hill to be. Sandi chose a shady spot under a large tree in their backyard. The delivery truck was able to dump the dirt exactly where she wanted it. Often, large dump trucks will not drive around behind a house. They will only dump on your driveway or front yard. Find a local person with a compact tractor/loader or skid-steer loader to help you move the dirt. It will be a lot easier than hauling tons of dirt with a wheel barrow!

hillside slide

When soil is dumped, it will have open spaces between the particles and clumps. These air pockets will collapse over time so it’s best to compact the soil as much as possible before putting sod over the area. Tim used Johnny  and the bucket to shape and compact Sandi’s hill. It was fun to watch Johnny go round and round. You could also compact the soil using water. In most cases, the kids want to start running up and down the hill immediately and wouldn’t be patient enough for that process.


Step 3: Cover the Hill with Sod

The hill will need grass to make it enjoyable for little feet. It’s best to use sod. It will be very difficult to get grass seeds to grow all around the hill with your little kiddos playing on it most of the day.

hillside slide
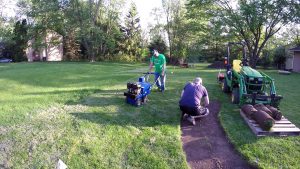
Instead of buying sod, Sandi decided to removed it from an area of her backyard where she planned to plant a pollinator garden. We rented a Bluebird Sod Cutter from a local rental company for $90.00/day. We highly recommend renting a sod cutter. It is way easier than cutting the sod by hand. Unfortunately, Johnny doesn’t have a sod cutter – yet.

Sandi purchased a pollinator kit from the local county soil and water conservation department. The kit covered approximately 100 square feet. It ended up not being enough sod to cover the hill so she decided to enlarge her garden area! We removed enough sod to completely cover the hill!


hillside slideRolls of sod are heavy so Johnny was really useful moving the sod from the garden bed to the hill! Roll out the sod starting at the base of the hill and work your way to the top. It’s OK if the strips don’t butt up to each other exactly. The gaps will grow together quickly. If your hill is steep, you can use garden stakes to keep the sod stripes in place. Using stakes with a rounded head keeps the kids from hurting their little feet if stepped on.


Step 4: Water, water, water! 

hillside slide

Water the hill well immediately after transplanting the sod. Then water the hill approximately 3 times per day for a week for at least 15 minutes each time. You can purchase a water timer that you program to come on and turn off at specific times of the day. If you’re like me, you will not remember to water at the right times nor long enough to keep the grass from dying.

Step 5: Maintain the Hill

hillside slideThis picture was taken 1 1/2 weeks after building the hill. As you can see, some of the soil has collapsed near the top of the hill where Johnny couldn’t climb. It is hard to tell when you first create the hill how much it will settle. Compact the soil as best you can and then expect to repair a few areas like this one. You can remove this small area of grass, add more soil, compact it again and then replace the grass. You may need to do this several times before the entire hill is fully compacted and covered in grass. Remember to water after repairs.

As your kids use the hill, the grass will be worn down and bare spots will appear.


Sandi had the dirt delivered a day or two before we arrived so it only took one evening to construct this hill slide using Johnny! Sandi also got a new, nicely tilled flower garden area ready to plant as well.

This was a terrific DIY backyard project.

I’m sure your kids will have hours and hours of fun!


DIY Lawn Care: Sprayer Calibration Process

4

We did a basic DIY Lawn Care video last year. We received a lot of questions about how we calibrated our pull-type sprayer before spraying the weed killer and herbicide. So we decided to video our calibration process this year. We’re not lawn care experts, just home owners who want to take care of our own property. We paid Tru-Green for several years to take care of our lawn. They were not perfect either. We saw areas of our yard that were missed or places the grass was killed. After buying Johnny, we decided to give it a try ourselves.  Here is a link to last year’s post and videos 2016 DIY Lawn Care Info and Videos

We purchased an economical 15 gallon sprayer at Rural King. This was not the most expensive sprayer but it works for the few times a year we need it. This sprayer can run on 12 volts, is rated at 84″ spray coverage, has an 18″ handgun with 15 foot of hose, an adjustable pressure with return to the tank and is glyphosate compatible. All this for under $200.00! The handgun is nice to keep up on the tractor when we want to stop and spray targeted areas without getting off Johnny. It will run up to 60 psi but for spraying lawn chemicals, we run it at approximately 25 psi.

Each year, we check the hoses and spray tips for any signs of problems like cracking (they are plastic after all) or missing parts. We clean the spray tips and strainers before rinsing and filling the tank with water.  This year, we  took the sprayer to our driveway where we could see the spray pattern. We turned on the sprayer and allowed it to run for a couple of minutes. At this point, we were be able to detect any  abnormalities with the spray nozzles themselves.  When we saw the spray pattern, we realized it was wider than the 84 inch rating. We measured the actual width to be approximately 10 feet.

Calibration Process:

Step 1: Calibration Course

For ease of calculations, we decided to use 1000 sq. foot as the area for the calibration course. Therefore, we needed to calculate the distance to drive Johnny to equal 1000 sq. ft. Since the total width of our spray pattern was 10 ft, the length of the course was easy to calculate! 1,000 sq ft/10 ft = 100 ft.

We marked out a course in our backyard that was 100 sq. ft long. You need to do this on your lawn – not a driveway or hard surface. We used orange spray paint to mark the beginning and ending point but you could easily use flags, cones or other markers (children, stuff animals, neighbors, etc).

While Johnny is great, he doesn’t have a speed-odometer. So we couldn’t drive him at a specific mph.  To be consistent, Tim decided to set the RPM to 2000, use low gear and press the foot petal all the way down.

It is recommended to drive between 3 – 4 mph for those of you with speed odometers on your rig.

For the remainder of this process, you will need a partner – wife, child, neighbor, even a teenager will do.

We then recorded the amount of time it took Johnny to complete the 100 foot linear course 4 times. Repeating the course multiple times help improve your accuracy. It’s a little boring but hey your yard deserves a little love.

It took Johnny over 28 seconds to complete the course one time (remember low gear! – this isn’t a race).

113.27 seconds is the amount of time to cover 4000 sq. ft. That will be important in the next step!

It was a nice evening and Johnny was enjoying the attention. However, we soon realized that this was taking more time than we had anticipated. You might want to do this on a Saturday morning when you have plenty of time. We have been so busy lately that every minute is planned. This was the only time we had – and the dandelions were getting huge!

Step 2: Determine the Flow Rate of the Spray Tips

Collect the amount of water from both tips for the amount of time in seconds recorded in Step 2. We used a 5 gallon bucket under each of the 2 tips. Tim turned on the water and counted down so that I could start the timer exactly when he started the sprayer. We allowed the water to spray into the buckets until ~113 seconds elapsed. We combined the water collected into 1 bucket. This was the total amount of water that would have been sprayed over 4000 sq. feet of yard.


We then measured the amount of water in the bucket and divided it by 4 to give us the exact amount of gallons per 1000 sq ft.

We used a simple plastic measuring container purchased at Menards. I didn’t want to use any measuring cups from my kitchen since there might be residual chemicals from the tank.

In summary for our calibration process, the output of our two-nozzle boom pull-type sprayer at an operating RPM of 2000, in low gear, with the foot petal all the down, and the sprayer at 25 psi, is 0.36 gal. per 1,000 sq. foot.

Step 3: Determine The Area to Cover

Measure or approximate the amount of area in sq feet for the grassy part of your yard. Remember to subtract buildings, driveways and other large areas that will not be sprayed. We subtracted our house, Johnny’s shed, the driveway, and our 2 garden areas leaving us with approximately 14,000 sq feet of grassy area (well, weedy areas before spraying).

Then divide the total sq ft by 1000 and multiply by the total output of your sprayer from Step 2.

For us, we needed to add 5.04 gallons of water minus the amount of chemical recommended per the product label directions to spray our 14,000 sq foot yard.

By this time it was getting dark. We quickly added the calculated amount of water and chemicals to our sprayer and Tim got to the business of killing weeds and preventing crabgrass. We’ll post another blog about the chemicals we used. Just keep in mind that there is a lot of choice for chemicals depending on your grass type and weeds common to your yard. Please research the best chemicals to treat your lawn!

For now, grab some popcorn and enjoy our DIY Sprayer Calibration video:

The sprayer should be rinsed well after each application due to build up of fertilizers and pesticide residues. Read labels carefully and apply according to the directions and pesticide laws.

Don’t hesitate to leave us a comment.  How do YOU handle the sprayer calibration issue?


DIY Diesel Fuel Storage Version 3.0

Back on a very cold day in January, Tim decided it was time to update our diesel fuel storage solution again. You may recall our video about using a 55 gallon barrel to store diesel for Johnny and a hand pump to easily dispense the fuel.
After using the barrel on the pallet for a while, we decided that it was taking up too much floor space. Our shed isn’t that big and we need every inch for Johnny’s toys. We had also been reading and responding to many of our viewers’ comments and wanted to incorporate some of those suggestions. Plus, it was so cold that we couldn’t do anything outside and working inside close to Johnny to improve his living/working conditions was the next best option.

Improvement #1: Drum Dolly

In addition to taking up floor space, the only way to move the barrel while on the pallet was with Johnny and the pallet forks. This wasn’t a bad solution but we couldn’t clean under it or easily refuel in a different location. We found a 55 gallon drum dolly at Rural King. It works ok but the wheels are a little small and get stuck too easily. If we do it again, we would purchase this one at Amazon. It’s wheels are further out on the ring, has a greater weight capacity (1000 lb. vs. 800 lb.) and it’s cheaper! Removing the pallet really freed up a lot of space. We can now tuck the fuel drum in a corner out of the way and store other items in that corner!

Improvement #2: 3/4″ Twister Swivel


The fuel hose had a kink in it where the hose attached to the pump. The kink affected how fast the fuel was dispensed even when Tim tried to hold it open during fueling. We placed a 3/4″ twisted swivel hose connector between the pump and hose. Again, we did not buy this exact one…but we wish we had!  It is cheaper, and otherwise looks exactly the same. The twister swivel has some really cool features that should keep the hose from kinking and make fueling up faster!

Swivel Features

  • Lightweight and maintenance free
  • 360 degree swivel rotation in middle joint & male end.
  • Mates with all standard and diesel hoses
  • Swivel elbow cast aluminum.
  • Fluorosilicate seals perform to -40 degrees F
  • Both swivel joints have double O-rings

If this doesn’t remedy the kink, several viewers suggested a spring hose guard. We’ll try that next. We wouldn’t want to get it perfect this go around – would we?

Improvement #3: Fuel Filter

Multiple viewers also mentioned adding a fuel filter to our storage solution. Those of us with compact tractors do not use as much diesel as say a farmer who works many acres of land. Therefore, the stored fuel sits for longer periods of time given rise to potential issues like water, sand, or dust getting into the fuel itself. We use Johnny’s shed to do wood working projects so contaminating the fuel is very possible. Therefore, we decided to add this Goldenrod Canister Fuel Tank Filter. It will remove microscopic particles (10 microns) of rust, sand, dirt, scale, and lint. It’s important to remove these particles before they reach Johnny’s internal organs! Now Johnny will run smoothly and not worry about his arteries clogging. Anything for our boy.

For detailed instructions on how we installed each of the improvements, please watch DIY Diesel Fuel Storage Solution Version 3.0. Both Tim and I were relaxed that day and not in any hurry. We were enjoying each other’s company and had a lot of the small talk which I edited out (you’ll be thankful for that). Our lives are busy and doing stuff together in the shed or outside with Johnny is quality time for us. We both enjoy these times and usually get a little something accomplished.

We want to thank all our viewers who watched the previous fuel storage solution video and made constructive suggestions. By implementing some of them, we have made our fuel storage better. Please let us know how you store your diesel for your compact tractor.

If you are interested in how to prep a barrel for diesel and where to purchase the hand pump we use, please read DIY Diesel Fuel Storage, Transport, and Pump via 55 Gallon Barrel for Compact Tractor.

Muddin with Matt (260 Backhoe digging trenches)

One afternoon last week, Tim txt’ed me that we had a project for Johnny at a co-workers house that evening. Once again I thought he was crazy. This time it was because it was wet and rainy. Tim had overheard Matt talking about his raised-bed garden project in his backyard. Matt has grand plans for 6 raised-beds made from concrete blocks stacked 3 high with the garden in the middle.   Over the prior weekend, he had dug trenches by hand for two of the beds as a footer for concrete blocks. Tim saw the pictures and told him Johnny could help with the digging. Since it had taken Matt both Saturday and Sunday to dig these two beds, he happily accepted the offer. However, Tim didn’t really expect Matt to want to do it that evening. But Matt really wanted to get the project underway so off we went.

Call Before You Dig

Call Before You DigOne of the first things I asked Matt was if he had “Called Before You Dig”. He replied that he had them come out last fall for a different project. He was absolutely positive that no utility lines or power lines are buried in the backyard inside the wooden fence. The only thing we found buried in the soil were tree roots and worms.

If you have never called 811 and found out what’s below ground in your yard, please do so before starting a digging project. It’s Free! Once they come out and mark your yard, take pictures of the markings so you’ll remember where all the lines are the next time you want to dig!

Wet! Wet! Wet!

John Deere 1025R 260 BackhoeIndiana has had an usually warm and wet March and beginning of April. It had rained earlier in the day and was forecasted to rain that evening. The ground is basically clay so the trenches that Matt had dug over the weekend were full of water. Against his better judgement, Tim decided to dig the trenches because Matt was so eager to proceed with his plan. We did get the trenches dug but made a mess in his backyard. We also left ruts in his front yard and down his side yard. Matt seemed happy with the sacrifice.

Since Matt had cut the sod, it was easy to scoop up a long length of it at one time.  However, it would often fall out the side of the bucket and back into the trench.  I realized that we could have used a thumb on the backhoe bucket (don’t tell Tim -he might want to buy one).  It would’ve  help lift up the dirt clods and deposit them in the middle of the excavation area. A thumb may be in our future.

Mud Stuck in the Bucket

I also thought of a new attachment for the bucket – it needs a trigger like the old ice cream scoops so that the operator could use a lever to force the muddy stuff inside the bucket out. This would have been a tremendous help. Tim kept having to shake the bucket or use a shovel to clean it out. What do you think? Doable?

Tim says there is a better answer for this problem. He says BXpanded makes a Trencher Bucket. For more information about Tim’s backhoe bucket, and what he would differently if he had a second chance, check out 1023e/1025r 260 Backhoe Optimal Bucket Size.

Team Work

John Deere 1023E 1025R 260 BackhoeTim and I make a great team. In this particular project, we worked together to move the tractor so Tim didn’t have to re-position the seat every time he wanted to move forward a few feet or to the next trenching area. The tractor was in low gear. I was probably going less than a mile per hour and had a good place to hold onto. We thought it was going to rain again any minute so doing this saved us a lot of time. Overall, it was safe and effective.

Ecclesiastes 4:9-10 Two are better than one, because they have a good return for their labor: If either of them falls down, one can help the other up. But pity anyone who falls and has no one to help them up.

The full video of this project is here:

Project Complete – Not Really

We got the trenches dug for Matt before it started raining again that evening. The rain filled the trenches to overflowing so he decided to run a drainage tile down the back of all the beds. We were not able to help with this part of the project since it’s been too wet for over a week now to get Johnny back out to play (I mean work). We did wash him over the weekend but that was about all we could do with him.

Our part of the project was complete; however, Matt still had a lot left to do. Check out Matt’s Blog to see the latest on his garden bed project.


Tim’s Super Cool Boots


Ok, one more thing. I’m sure you were all mesmerized by Tim’s boots! He has worn this type of mud/snow boot for his entire life. They are warm, waterproof, and comfortable. They last for many years. In our case, they last 10 years or more until the rubber finally gives out. They are not good for running! However, they are great for muddy conditions like we had at Matt’s house, or in snow.
You can get your own pair of boots by clicking the link to the left. However, I’m not sure that you can be as cool and handsome as Tim. (Perhaps Tim got his hands on the keyboard for this part of this article???)

Thanks for reading and watching!

Buckle Up Johnny! Is there a CargoBuckle in your future?

8


A few years ago, I started working at a company that sells safety restraints for baby car seats, school bus seats and large vehicles. At some point, I was given a tour of the product display area where there sat a trailer with ratcheting straps unlike any I had seen before.

My Nemesis

I’ve never figured out how to use the old style ratchet straps to secure Johnny to our trailer. I dreaded trying to help Tim with this part of the load/unload process. The typical tie down straps are difficult for me to get started. I always feed the strap into the ratcheting end incorrectly making it near impossible to work correctly. It also takes a long time. We always use 4 tie downs, this process took longer than attaching implements to Johnny and driving him onto the trailer.

So I began to ask questions of employees who had worked at IMMI longer than me. No one really seemed to know if these “CargoBuckles” would hold down a tractor. I wasn’t asking the right people. I should have gone straight to the Sales people or an engineer. This product is typically marketed to the recreational sector – ATV, UTV, and boats. Just Hook, Rachet, and Go is the slogan. I wanted to Hook, Rachet and Go too, but I knew that our tractor was probably heavier than a typical ATV or boat. Of course I told Tim about what I had seen. He looked up the product specifications and features – smart guy right?

Product Specifications

  • Strap Dimensions: 2″ wide x 6′ long
  • Safe working load limit (WLL): 1,167 lbs
  • Maximum Load (breaking strength): 3,500 lbs
  • Mounting bolt dimensions: 3/8″ diameter x 1-3/4″ long (included)
  • Quanity: 2 rachet straps per package
  • 1-Year limited warranty

Features

  • Heavy-duty, tie-downs
  • Self-retracting straps that automatically wind up into built-in housings
  • Ratchet mechanism that make it easy to tighten down straps and maintain tension
  • Wide, rubber-coated handles
  • Dual safety locks ensure each ratchet arm stays in position
  • Push-to-release lever quickly and easily loosens straps
  • S-hook is vinyl-coated
  • Corrosion-resistant steel body
  • Sturdy plastic housing with a stainless steel spring
  • Engineered in Indiana!

Great Reviews

Tim also read reviews about the CargoBuckles and people love them. There was only one complaint -if you leave them out in the elements for a long period of time, the plastic becomes brittle and might break. Also, the metal components begin to rust even though it is corrosion resistant steel body. Overall, these buckles seemed to be the perfect fit to buckle up Johnny for safe travels.

Mounting


We decided not to mount the CargoBuckles directly to the bed of the trailer due to the rust/wear issue. Instead, we went to Menard’s to purchase shackles and bolts. We actually couldn’t find all the supplies we needed at Menard’s and had to go to Tractor Supply! Tim wanted to reinforce the trailer bed underneath the shackle with a second piece of steel. We found the perfect piece at TSC that already had bolt holes at both ends. To see us drill holes in our new trailer (gasp), mount the shackles and test the CargoBuckles with Johnny, watch our video.


Let’s do the Math

But, are these straps strong enough to keep Johnny from jumping off the trailer at the first attractive looking project he sees? We started by reading this document from the Federal Motor Carrier Safety Administration. Section 2.1.5 says:

The WLL of all components used to block cargo from forward movement must be 50% (or more) of the weight of the article being blocked.

Each of these straps has a Working Load Limit of 1167lbs. We have two of them on the rear, so a total WLL of 2334lbs. If I’m interpreting this correctly, this means that we could safely (and legally) tie down a 4667lb object. Johnny would weigh ~1450lb (tractor) + ~600lb (FEL) + ~600lb (backhoe) (Total ~2650lb) in his heaviest configuration. So, these straps should be suitable. Whew. No more math! (at least until we get to the finance committee section!)

Loading Johnny

Loading Johnny has gotten so much easier with the new CargoBuckles. Katriel tried them out for the first time in our video. We didn’t even give her a chance to try it before filming her, which maybe we should have. But, the video shows just how easy they are to use even for a novice. Now, both Katriel and I feel like we can load or unload Johnny without Tim’s assistance! This should make moving Johnny to a project location much faster and efficient.

Finance Committee Approved


I was able to get employee pricing for these buckles but the price on Amazon is very reasonable for the quality and functionality you’ll receive. A pair is around $65 and is available for Amazon Prime-that’s a little over $130 to hold down your compact tractor securely and have ease of loading/unloading. I am sure your finance committee will approve!

If you choose to purchase these, please click use the Amazon links in this post.  This shows your appreciation to Tractor Time with Tim while not increasing your cost.