Wednesday, March 25, 2026
Home Blog Page 6

Planting Potatoes – Christy’s Version

During Katriel’s spring break from Purdue, she and Tim were so anxious to plant something – anything really – they decided that it was time to get seed potatoes in the ground. Personally, I thought they were a little crazy. It had snowed the day before. And, to be honest, I’m not a huge fan of gardening. I grew up on a farm and every spring we had to plant what seemed like a million acres of vegetables most of which I didn’t like to eat. It was hard, sweaty work that I didn’t want to do.

Let Tim Work!

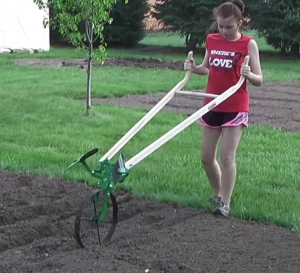
These days, the work has actually gotten easier with tools like the Hoss Double Wheel Hoe. After tilling the soil with Johnny, Tim adjusted the plows on the Wheel Hoe such that the points touched each other making it was easy to dig the furrow for the potatoes. All he had to do was push the hoe down the length of the garden. All I had to do was sip sweet tea.
Seed Potatoes
While I was off doing something I can’t remember (old age), Tim and Katriel went to Menard’s to buy the seed potatoes. They purchased Red Lasoda and Mega Chip varieties. I think they picked Mega Chip just because they liked the name. Who wouldn’t want Mega Chips!  The cashier got a big kick out of being videoed for our YouTube channel. Tim and Katriel were probably her strangest customers all day.

Hard Labor

Then came my part of the project (probably harder than Tim’s). I had to cut all those seed potatoes into sections containing at least 2 eyes. Then Katriel and I placed one section at a time into the newly plowed furrow while Tim stood back and bossed. We used our feet as measuring sticks. This process was quite the balance challenge. Katriel and I almost fell over several times. I am sure the neighbors found us amusing.

Tim finally decided he could do something besides talk– so he repositioned the plows on the Hoss Wheel Hoe to the outside edges so that the soil would be thrown back in over the seed potatoes. This only took a couple of minutes. He likes to make us think he’s working hard but we know the truth. I wish my family had had one of these wheel hoes when I was growing up. I might not have dreaded the annual gardening. Someone at Hoss knew this, and designed a Junior Wheel Hoe with shorter handles “to accommodate the woman or youth gardener” i.e. short people like me and Katriel! If only I had one of those way back when…

On The Road Again

Next came the fertilizer but as usual with our projects, we didn’t have enough. So off to Menard’s they went (again!!). It’s a good thing Menard’s is 5 minutes from our house. I stayed home to cook dinner which included one of their favorite potato dishes (recipe below). They stayed longer this trip, I think they evaluated every bag of fertilizer in the store.

Once home, Tim and Katriel lovingly spread fertilizer beside each carefully planted row of potatoes. Tim once again reconfigured the wheel hoe to cover over the fertilizer. I think they love that tool. I understand – I love my kitchen gadgets.

Overall, the project was easy and fun. Maybe I’m just older and able to enjoy it more. Now we are watching every day waiting to see the potatoes break through the ground. It’s a little like watching paint dry but one day, we’ll see green.

Oven Fried Potatoes

Oven Fried Potatoes
6 medium potatoes (russet, mega chip)
3 tablespoons olive oil
2 teaspoons salt (kosher or table)
1 tablespoon seasoned salt

Preheat oven to 425 degrees (400 degree is using convection)

Wash and peel potatoes (unless you like the skins). Cut potatoes into bite size pieces in a large bowl. While cutting the potatoes, place pieces into water to cover, this keeps the potatoes from turning brown during the process. Drain off the water and add olive oil and seasonings. Stir to coat all of the potato pieces. Spread out evenly onto a greased 9×13” baking pan. Cook approximately 20 minutes, remove from oven and stir to turn over potatoes. Return to the oven for another 15 – 20 minutes or until golden brown and delicious. Serve Immediately.

(P.S. Tim’s says to bring the oven baked potatoes over after you make them!)

Using the Hoss Wheel Hoe Plow Set to make (and cover) rows

Around our garden, the Hoss Wheel Hoe is most useful during planting time. We use the wheel hoe to lay off rows where we plant our potatoes and other crops. We find this to be a quick, easy, and very effective way of planting most of our crops.  If you are interested in purchasing a Hoss product, please click any of the images, or Hoss links on this page.  Using these links will reward us with a small commission, and will not increase your cost.   Thank you very much.
Hoss Wheel Hoe Plow Set
Depending on the crop, we start out by making either a ‘furrow’ or a ‘hill’ for our row. In the case of potatoes, we make a furrow. This is easily done using both the left and right plows of the Hoss Wheel Hoe Plow Set.   Attach the plow which ‘throws to the right’ on the right side of the hoe, and attach the plow which ‘throws to the left’ on the left side of the plow.  The picture below should help to visualize this configuration.
Hoss Wheel Hoe Plow Set

The Hoss Website (and associated videos) shows usage of the Wheel Hoe in very sandy soil. It obviously works very well in those conditions. We typically show a slightly different situation. We have loam soils, and, at least for planting situations, we use the wheel hoe immediately after tilling with our tractor mounted tiller. This leaves a light and fluffy soil which behaves much like the more sandy soil.
Hoss Wheel Hoe Furrow
In other soils (we haven’t lived here all of our lives) which have more clay, the wheel hoe will still work very well when used behind a roto-tiller. However, it will not be optimal when used on compacted soil.  We recommend using a tiller for your primary tillage, and using the Hoss Wheel Hoe for the more detail work.

Covering the Potatoes

Back to our planting…after we get the rows (furrows) made, we place the potatoes (with love as Katriel says) into the furrow skin side up.  Then, we reconfigure the Hoss Wheel Hoe Plow Set to cover or ‘fill-in’ the furrow we just made. Hoss Wheel Hoe Fill Furrow    This reconfiguration is straightforward. We simply remove both plows and trade sides.  Put the ‘left throwing plow’ on the right side, and the ‘right throwing plow’ on the left side.  You can experiment with how far apart these need to be.  Our experience is that they need to be almost all (if not all) of the way apart.  You can ‘push faster and deeper’ if they are not filling your furrow as much as you would like.


Here is a complete video of the potato planting operation.


Planting Corn with Wheel Hoe

Several crops (like sweet corn) can be planted in the same exact method as the potatoes. With corn, you need to be a bit more careful about how deeply you cover it. Usually only 1 1/2 inches or so. In this video, we plant the corn by hand, in furrows prepared just as like we described above.

Planting Small Seeds on Ridges

Hoss Wheel Hoe
For small seeds which do not need to be covered deeply like radishes, lettuce, etc. You can use the wheel hoe to prepare a ridge instead of a furrow (with the plows throwing toward each other). Then, you can turn the wheel hoe over, and use only the wheel to make a small depression in the ridge. You can then plant your small seeds in that depression. This picture isn’t perfect, as we weren’t using the ‘ridge’ for this particular crop, as neighbor Bob didn’t think it was necessary. However, we are using the wheel to compress the soil ever so slightly for a perfect seedbed. After distributing the seed, you can cover with a rake, or by hand (obviously the Katriel ‘with love’ approach).


Summary

There are many ways to plant a garden. In fact, Hoss has a more sophisticated approach available which we’ll discuss in a future post. However, this post shows that a wheel hoe can be used to make planting easier, and for a small to moderately sized garden, it might be the most effective approach.

Click any of the Hoss links, or photos above to be directed to the Hoss website, where you can purchase your very own Hoss Wheel Hoe.

Hoss Wheel Hoe Disk Harrow Attachment

Even though it’s about 35*F outside, it’s time to start planning for gardening season! That means buying seeds, starting some of them inside, and making sure your garden beds are ready for growing.

Hoss Wheel Hoe Disk Harrow

For us, it means tilling. But sometimes, we have to till well before we’re ready to plant the entire garden. Especially for corn, we might plant half of the garden, and then leave the other half for a couple weeks so that we don’t have like three million ears of corn ready at the same time. So what do we do when we leave just a small part of a garden to be planted later when we can’t fit a tractor there? We attach the disk harrow to our Hoss Wheel Hoe.

The cool part about this specific use of the wheel hoe is that it doesn’t have to dig very deep into the soil to be effective. The two to three inches that this will till is more than enough for most of the things we plant in our garden. Being comparatively shallow also saves us a lot of energy.  More depth = more drag = more effort = less space covered by me = less gardening = less fun. Maybe I can do my master’s thesis on that very equation…

Hoss Wheel Hoe Disk Harrow

Here my dad is using the disk harrow to prepare for planting corn. By placing the wheel at the end of the previously tilled area, we ensure that every part of the garden gets two trips worth of plowing before we start planting. Usually that’s enough for our soil to loosen up, but we are blessed with some incredible soil around here. Right underneath the surface is moist, dark soil.

The design of the disk harrow allows the soil to be raked a different way on each trip through – which helps us make sure the dirt will be a nice, soft bed for the seeds we’re about to plant.


The Disk Harrow is best suited for relatively recently tilled soil.  It does not work well in hard-packed situations, as it tends to pull to the left or right when one side of the disk blades dig in.

If you don’t already have a Hoss Wheel Hoe, I would highly recommend that you get one.  It makes garden planting and tending much easier and more fun.    Click on this image below to get your own wheel hoe.

How To Attach Trailer to Front End Loader

We often need to move our trailer around in the yard, or put it into the shed for storage or maintenance.   We have found that a front mounted hitch provides a few key benefits for these quick moves.

First, using the loader to hook up means that the trailer jack does not need to be raised and lowered.  The loader can raise the trailer hitch, move it around and sit it back down again very quickly.

Second, it is easier to hook up when driving forward rather than backing up, as left/right adjustments can be more easily attained.

Third, and likely the biggest benefit is how the trailer can be precisely positioned when necessary.   For instance, our shed is small, every inch counts.  When we put the trailer in, we need it to be optimally placed.     It is MUCH easier to control the trailer when hooked to the front of the tractor.  The video below will demonstrate the ease of navigating the trailer when driving forward.

Front Hitch Options

I’ll focus on the loader mount versions rather than the frame mount versions because of the additional flexibility of lifting the trailer with the loader rather than raising/lower the jack.
hhfr1-600x400
However, if you have no loader, you can still claim the benefits of precise trailer navigation. One of our favorite vendors, Heavy Hitch offers a
2 inch receiver option for the front of 1-series Deere tractors. If you have no loader, this might be a great option for you.

Ken’s Bolt On Hooks

Let’s examine some of the loader options. Ken’s Bolt On Hooks offers a simple and effective bucket mounted receiver hitch.  With this option, I would recommend getting the ‘backing plate’ option as the loader bucket is somewhat thin on the top where the receiver would be mounted.

kboghrx-hitch-w-plate
 This option is great as long as your trailer tongue weight is relatively light.  The lightweight steel on the bucket cannot handle heavy forces applied to the top/center of the bucket.

I have this hitch on my bucket.  Check out some videos, such as ‘Shirley’s creek bank’ to get a view of it.


Artillian

artilian30jd-2rh-ftfs363_180

Artillian offers two options for their pallet fork frames.  If purchasing new forks, the latest generation of the 3000 lb capacity frame has a 2 inch receiver built in. If you already have the 2300 lb capacity frame (like me), you can add a 2 inch receiver hitch adapter to the frame.   Either of these options will provide a
artillian_5-2rh-f_800 strong and flexible receiver hitch option.  Christy calls this the ‘cadillac option’.

If you haven’t yet purchased Artillian forks, the receiver hitch may be a good reason to upgrade to the 3000lb capacity frame.


Titan Attachments

Another approach is to use a dedicated JD Quick attach receiver hitch.   The ease of removing your bucket makes this option attractive. This plate would lay flat for storage, and could be easily picked up with the loader tilt feature.  This approach might make it difficult to see the hitch ball as you are attempting to hook up the trailer, as the large plate will likely block your view.    (Thanks to Christy for pointing this out)!

Titan also sells a skid steer attach version of this receiver plate.


Finally, the option we demonstrate (and modify) in this video.   This option adds the 2 inch receiver directly onto one of the forks.    This option is inexpensive, lightweight, and easy to install.    Christy’s least favorite part are the obnoxious Christmas colors!

The one I purchased also came with a safety chain.  However, at the time of this writing, this version is not available.   As you’ll see in the video, a safety chain IS necessary.    Any high strength chain will do, and I do not think it needs to be as heavy as the one included with our package.

While this option worked very well for our older trailer, our newer trailer has much more tongue weight.  As you’ll see in the video, this additional weight puts a lot of stress on the end of the fork.    So, in this video, we modify the ‘clamp on forklift hitch adapter’ to allow it slide further onto the fork.  This reduces the overall distance from the fork frame by about 20%, from 45 inches to 36 inches.     This reduces the leverage on the fork and makes me much more comfortable using it with our trailer.

Take a look at the video to see the fork mounted receiver, and to see our modifications to it.


Tim’s New Favorite Adjustable Pliers

11

A year or so ago, I received a set of adjustable pliers as a Christmas gift.
At first glance, they looked like a simple pair of ‘water pump’ (tongue & groove) pliers. However, after a closer look, I realized that the joint was made differently than traditional water pump pliers. First, it is locking. No more slippling and sliding between grooves when you apply pressure. Second, it provides many more ‘notches’ allowing the pliers to be adjusted to precisely the right size necessary for the task.

adjustable pliers

The jaws are narrow so that the pliers can reach into tight places. This somewhat ‘petite’ form results in a lightweight easy to handle tool.

I never thought I would be bragging on a pair of pliers. They are just pliers right?

Upon researching these pliers online, I found that they are made for Craftsman by Knipex.  At the time of this writing, the only 7 inch Craftsman version is MUCH more expensive than the Knipex version.  However, the combo 7 & 10 inch price on the Craftsman is not so bad.   So, I’ll include both links here.   I know they are not cheap, but I believe you will like these pliers!

I’d appreciate it if you would purchase via the links below.  This doesn’t cost you any extra, and it helps to support Tractor Time with Tim.   We really appreciate it.


DIY Lawn Fertilization and Weed Control

11

The standard Weed-n-Feed granular product never worked too well for me. This is likely attributable to laziness. I didn’t want to get out early enough in the morning to apply it while the grass was wet! However, another negative was the cost of the name brand Weed-n-feed products. At $50 or more per bag, the cost is comparable to a lawn service.

So, for a few years, I used a name brand lawn service. They did a beautiful job. However, as the years rolled on, I was still bothered by the cost, and the nagging lack of that ‘DIY satisfaction’ feeling. Honestly, if you don’t get a certain level of satisfaction by doing something like this yourself, then I would suggest you continue to use (or start using) a professional lawn service. The can do an incredible job of keeping your lawn green and weed-free for most (hard to handle the hot/dry part of summer) of the year.

If you are on the fence, check out our lawn chemical/fertilizer application videos from last season.

Ok, so you STILL want to do it yourself? So do I! Let’s dig in!

Broadleaf Weed Control

First, we need to control dandelions. Yes, my young daughter enjoys dandelions, and is sad when they are killed. However, with some training, she can be convinced about how evil these persistent yellow buggers really are! Dandelions and other broadleaf weeds can be killed with 2,4-D. However, using the agricultural version of 2,4-D can present some issues, as it tends to ‘drift’ when sprayed, and may kill some flowers alongside your yard. Also, you can get better weed control by getting a mixture of 3 or more chemicals. This mixture is often referred to by a brand name ‘Tri-Mec’. I use this (please order through this link to support Tractor Time with Tim):

This should control the broadleaf weeds in your yard. If it does not kill after 3-4 applications, you will probably need to specifically identify the weed causing issues, and ask for help from an expert.

Crab-grass

Crabgrass is very difficult to kill once it is growing. Further, it seems to thrive in the late summer heat when the ‘good looking’ grass is really struggling. For whatever reason, crab-grass doesn’t seem to need much water to thrive, and it can expand over large areas of your yard in just a few days.
There are some ‘crab-grass killers’ available, but they are difficult to use. It is easy to damage your lawn with these chemicals. So, the best defense against crab-grass is to keep it from getting started. We can do this with, yes you guessed it, ‘Crab-grass preventer’.

There are several chemicals to prevent crab-grass from emerging. My favorite goes by the brand name ‘Barricade’. Barricade is quite expensive, and there are generic versions available. I use this one:

It is best to ‘premix’ this product in a small container to dissolve the granules, then poor the pre-mix into your sprayer.
I recommend applying this with each time you go over your lawn. The only time to skip this product is if you are trying to get new grass to sprout and grow. This product will prevent any grass from sprouting and growing.

Fertilization

Much could be written about lawn fertilization. I am certainly no expert in this field. However, the basics are relatively simple. You need a fertilizer with high nitrogen content. This is the first digit in the 3 digits you always see on fertilizer. For example, 18-3-6 is 18% nitrogen, 3% Potassium, and 6% Phosphorus.

You can get your fertilizer in liquid form, or in granular form. If you have both types of spreaders, then simply choose the least expensive approach, which is usually granular. If choosing a liquid, it is best to choose a ‘controlled release’ product. Here is an example:
CoRoN from domyownpestcontrol
I chose to use this fertilizer from Rural King last year:
Gordon’s Fertilizer from Rural King
You can also choose a non name-brand granular fertilizer from your local hardware (or big box) store. Just be sure to avoid the combo ‘weed-n-feed’ treatments if you are applying the chemicals separately as I recommend above.
I usually find the lower cost granular fertilizers way at the back of the store in both Menard’s and Lowe’s here. They would much prefer selling the $50 bags than the $10 bags.

Summary

I hope this helps you to get started. My main advice when beginning is to use low application rates to start. You can always re-apply it a second or third time if you don’t see the desired results. This is much easier than re-seeding your entire yard due to over-application.

Deere 1023E vs. 1025R

You’re seriously looking for a sub-compact tractor. Most likely you are excited about the potential purchase while simultaneously in shock when you consider the price of this ‘over-grown lawn mower’. This feeling of shock likely has you considering the 1023e rather than the EVEN MORE costly 1025r. This article will evaluate the differences, hopefully helping you to make a wise decision.

The Similarities

First, we should examine the shared aspects of these tractors:

  • Same Frame.
    • This means the same strength of materials, same height, length, width, etc.
  • Same Tires
    • Combined with the frame, this means the same turning radius
  • Same Attachments
    • Backhoe, Loader, Front Blade/Blower, Mid-mount mowers are identical, and are available on both tractors.
  • Same Hydraulic Capacity
    • Hydraulic pressures and flow rates are identical.

The Differences

Based on all of the shared characteristics above, the 1023e seems like the better value.  But, before we make a decision, we should evaluate the differences. I’m going to list them in the order of importance from my perspective.

Engine Size & Power

Arguably the biggest difference is in the engine. The engine has a much (~30%) larger displacement, resulting in roughly 2.5 additional horsepower. Maybe 2.5 HP isn’t so much, but on a percentage basis, the 10% improvement seems quite relevant. While I haven’t heard any 1023e owners complain about lack of power, I certainly wouldn’t want any less power on my 1025r.

3 Point Hitch Position Control

All larger tractors have this feature. Rather than a simple ‘up/down’ control like the loader or other hydraulic outlets, the 3 point hitch can be set to any specific height. There is an adjustable ‘stop’ which allows the operator to repeat the same working depth on each pass. This type of control is important on almost all types of ground engaging equipment, especially plows and cultivators which do not have any ‘gauge wheels’.

Better Seat

The 1023e does not have arms on the seat. For me, this is very important. The 1025r arms improve the comfort level significantly in my opinion.
1023seat
1025rseat

Tilt Steering Wheel

There isn’t a lot of room to get your legs in and around the steering wheel. So, I find that I use the tilt wheel EVERY SINGLE TIME I get off the tractor. I don’t like to drive it with the wheel in the upper position, and I can hardly get out/off with the wheel in the lower position. Try this out for yourself. It is easy to test at the dealership, even without starting the tractor.

Fender Mounted Work Lights

The front lights are essentially useless when using the loader. They shine directly on the loader bucket, providing a glare in your face, and a shadow on what you WANT to see. The fender lights are a requirement if you intend to work at night. I would even go a step further and suggest that you get the additional ROPS mounted lights. With all 6 lights, you can finally see what’s going on.

One other note on the lighting. I THOUGHT I read that the 1023e did not have the same pre-wiring for the additional ROPS worklights and rear light(s) which the 1025r has. However, I cannot confirm that at this time.

12v Outlet

The 1023e does not have the 12v outlet. So far, I know of 3 uses for this (which don’t cause cancer…).

  1. I have a sprayer with a 12v pump. I use the 12v connector to power this sprayer.
  2. The Artillian Hydraulic Diverter Kit used with grapples and the loader mounted blades.
  3. Charging all of the Tractor Time with Tim video and audio equipment with a 12v USB converter.

You may not need to have a bunch of video production equipment on your tractor, and you may not be planning to buy a grapple or sprayer either. However, it is quite nice to know you have the necessary expansion available if needed.

Rubber Floor Mat

I don’t have much to say about this. I don’t know if it makes a difference or not. As a kid, all of the tractors on our farm had steel ‘floorboards’. The only time I remember this being a problem was with the IH 656 Hydro belonging to my uncle. It became so hot that it would burn your feet through your shoes! …but I digress. I doubt you’ll burn your feet with the 1023e!

Toolbox

A toolbox is very important (at least for me.) I suspect you can talk your dealer out of a toolbox, even if you choose the 1023e. You need one.

Cruise Control

This one sounded important when I bought the tractor. Perhaps it would be if I were mowing 5+ acres with no turns involved. In reality, I’ve tried to use it only once or twice, and then just because I wanted to figure out how it worked. I found it cumbersome. The foot pedal is easy to use and maintain consistent control. It is actually surprising how well one can control the tractor with the foot pedal, and equally surprising that it doesn’t cause fatigue on the leg and foot.

Summary

So, you’re planning to buy a Deere 1-series and necessary attachments. The 1023e is $1800 cheaper than the 1025r on the Mutton Power website right now. I suspect you could push them a little on that delta. I would estimate that the 1025r outsells the 1023e at least 5 to 1. I base that estimate on the ratio I see on dealer lots of each model, by the discussions on Green Tractor Talk and by the ratio I see for sale on craigslist.

Of course, it is your money. You should NEVER spend more than you can afford. Having said that, if you are cutting it so close that the additional $1800 makes it un-affordable, perhaps you should save up for a year or two before entering the sub-compact tractor market.

For me, (and the vast majority of 1-series buyers), the choice was rather obvious. Get the 1025r. You will not regret it.

The 19-year-old’s Opinion on the Honda Ridgeline

5

You know, being in China made it a little difficult to communicate with my parents over the summer. The time difference was difficult and sometimes the internet didn’t work.

But I found out that they bought a new Honda Ridgeline by watching the YouTube video about it!

Are you kidding me? No one even asked my opinion!

So now, I’m giving my dad (and you all) my opinion without being asked. 🙂


My parents picked me up at the airport in the new Ridgeline. I wasn’t sure how I felt about it, especially because I missed the Katrielmobile, but I ended up enjoying the ride and the new vehicle.

One of the things I like, since I’m often delegated to the back seat, is that the back seats sit up about 6″ higher than the front seats. This way, I can see over mom’s head and look out the front windshield, making me a more effective backseat driver.

After a few days back, my dad finally let me drive. The Tacoma we had previously sat so low that I could barely see over the dashboard, but I was surprised to find that the Ridgeline had power-seat-raising superpowers. All you have to do is tap a lever on the side of the seat and blast off to higher heights! You can scoot the seat forwards and backwards and up and down and into the future and the past! I visited college-aged dad while adjusting the seat. Not too much was different, except he had more hair and no Menards shirts. Anyway, I find the seat to be comfortable for a short person like me, and I think dad find’s it comfortable for a tall person like himself. Nice versatility.

The Ridgeline has made several trips back and forth to Purdue. Of course, I have a ton of stuff to bring back and forth, and there’s a secret compartment in the bed of the Ridgeline that allows me to hide my top-secret teleporter plans. It’s big enough that I can fit in it myself, too. Might be a good place to nap. Speaking of naps, during the holidays I took several naps in the back of the Ridgeline. After a long week of finals, I may not have been the most selective about my napping locations, but I never felt uncomfortable during the 20+ hours I spent sitting in the back.

Now, my mom has essentially stolen the truck from dad. I don’t mind – it’s kind of funny to watch my dad drive around in a Prius.

The Ridgeline has quickly become a beloved member of the family. I’m still a bit salty about finding out my parent’s got it over YouTube… but I think I can finally admit they made a great choice.

1023e/1025r 260 Backhoe Optimal Bucket Size

The 1-series backhoe has several bucket attachments available.  This article discusses the choices I am aware of, and makes a couple of recommendations which might differ from conventional wisdom. I bought my hoe used, so I didn’t have any choice to which bucket came on it. I was ‘stuck’ with the 8″ whether I liked it or not.
backhoebucket

Most of the 260 backhoes are equipped with the 12″ bucket.   This bucket is considered so ‘standard’ that you might not have been asked what size you wanted during the pre-purchase discussions.  The dealer may have taken it for granted.      Since it is the default bucket, then it must be the only logical choice, right?    Let’s explore…

There are 3 sizes of bucket available from Deere on the 1-series 260 backhoe attachment,    8″  (2 teeth); 12″ (3 teeth) 16″ (4 teeth).  If that doesn’t make the choice difficult enough, BXPanded offers a 6″ Trencher Bucket and a ripper tooth suitable for digging/cutting roots.

The trencher bucket pictured here would dig a narrower trench than the 8″ bucket, allowing the trenching operation to go faster, and have less ‘spoils’. Additionally, the low sides would keep the bucket from packing full of mud as the 8″ bucket does at times.
bxpanded_jd260nb_1_thumbnail

The ripper tooth would be quite useful for a portion of the ‘stump removal process’. The main part of digging out a stump is to break the roots which protrude in all horizontal directions. You start next to the stump, attempting to break the root. If the backhoe is not strong enough to break it there, you move outward, where the root is smaller. You will eventually get out far enough to be able to break it. A larger bucket reduces the directed hydraulic force a specific point on the root. Additionally, it disturbs more soil, making a larger mess. For these situations, the ripper tooth would wonderful.

bxpanded_jd260rt1_thumbnail

Unfortunately, the ripper tooth doesn’t work well for the entire stump removal process. At some point, you need to dig down below the main root ball to get to those deeper roots. Changing the bucket would take too much time with the standard configuration. So, this is why the BXpanded ‘quick connect’ is so valuable.

bxpanded_bhcjd260_1

The BXpanded line of attachments provide a significant improvement in 260 backhoe options. Given the relative weakness of any sub-compact backhoe unit, it is even more important to have the proper bucket for the job. This leads us back to the original question. Which one(s) should we buy? The best approach to answer that is to think about how you will be using your backhoe.

What will you be digging

If you plan to dig large/deep holes frequently, quite frankly, I would recommend thinking about a different backhoe. Perhaps a mini-excavator or something similar. Take a look at this video for an ‘in-depth look’ (ok, I couldn’t resist) at the 260 backhoe digging a relatively large hole.

So far, I’ve used my backhoe for digging out stumps, digging trenches, and a rare hole for some reason. I view the backhoe as a ‘power shovel’. It is great for jobs that COULD be done with a hand-shovel if I were younger and absolutely HAD to do it. In most of these situations, I find the 8″ to be perfect, if not a bit TOO BIG for the task. I recognize that this is not the prevailing view from Deere dealers and other 1-series owners.

Most Economical Choice

Based on the type of work I’ve had to do, I would choose the 8″ bucket again. This bucket is the best choice for narrow trenches, and the best choice for hard soils due to its small footprint. There are two disadvantages, one is that it takes longer to dig out a big hole, and the other is mud will stick in the bucket. I can avoid the second issue by digging when it is not so wet.

I just don’t see the 12″ as a good general purpose bucket. Digging a 12″ ditch just to lay an electrical cable seems quite painful. Also, if the dirt is really hard, digging with the 12″ could be difficult.

Premier Solution

If I had all the play money I wanted, I would choose a different path. In that case, I would choose the 16″ bucket when buying the backhoe.
I would purchase the BXPanded Bucket Quick Connect, the BXPanded 6″ Trencher Bucket and the ripper tooth.

These 3 options would provide solutions for all digging operations.
Maybe someday I will have enough $$ to expand my bucket selection!

Greasing (Lubricating) the John Deere 1025R

Note: Purchasing via the links below help to keep Tractor Time With Tim running.  If you are interested in the products, please use the links below to purchase.   Additionally, if you see an advertisement on this site which is interesting, please click it.  Even without buying anything, you help to make TTWT great again!

If this is your first tractor, you may not have much experience with the concept of greasing.   So, we’ll look into what is necessary to grease your subcompact tractor.  Obviously if you have a different brand, or model, your grease fittings will be in different locations.  However, the concepts are the same.

First, you’ll need a grease gun.   Viewer feedback has recommended a Lincoln brand grease gun such as the one shown to the left. This is the ‘go to’ brand. …and from my experience, this isn’t a place to go cheap!

The pistol grip makes it a one-handed operation to dispense the grease, and it is much more cost effective than the battery powered grease guns.


Next, you’ll need grease. There is lots of debate about brands and types of grease.  For this particular purpose, it probably doesn’t matter too much.  The grease should be ‘multi-purpose’ grease.   I’ve added a link to a suitable tube of grease from Amazon.


One more item which I highly recommend is the “Lock-n-lube” grease coupler. This makes greasing MUCH less frustrating. Just lock it to the grease zerk and lube!

You’ll see the Lock n Lube used extensively in the 1025R lubrication video.    In this video we visit every fitting on the tractor. This includes the steering cylinder, the MFWD shaft, the main drive shaft, and the mid-PTO.

We actually show two different approaches to access the difficult “front u-joint” on the main drive shaft.  First, we show how to access it from the bottom of the tractor, then we show how to access it from the top.  The access from the top takes a bit more time, but provides much better access to the universal joint.


Update: Several experienced tractor owners replied in the comments section with a better method of greasing the main rear drive shaft u-joint. They mentioned that by using a ‘needle grease tip’ that this fitting can be greased from below. Makes perfect sense to me. I will provide a video update on this when I next grease the tractor (after I get MY needle tip).
Here is a link to a needle tip.
If you use this one, I would suggest a second grease gun so that you don’t have to change the tip.


Another viewer recommended a longer hose which allows the grease gun to be placed on the floor. Here is a link to such a hose:

I hope you enjoy the video.