 Carmel IN –
Recently we helped construct a Hillside Slide Natural Playground. Sandi (the mom) saw the idea on Pinterest and wanted to recreate the slide in her backyard for her kids. She searched the internet for information on how to build the hill for the slide but didn’t find detailed instructions – only pictures of completed projects. Sandi’s yard does not have a natural sloped area for the slide so she needed to haul in soil to create a hill were there wasn’t one (we are in Indiana after all). She needed Johnny’s ((John Deere 1025R) help to shape and compact the hill, haul sod to the hill, and then till the new garden area.
Steps to Creating the Hillside Slide Natural Playground
Step 1: Purchase a slide
First you need to locate or purchase a slide. This will help you determine how much dirt you’ll need for the hill. Sandi purchased an 80” slide. She wanted the hill and slide area to stay interesting to her children for many years so she went with a longer slide. Read the detailed description of the slide you choose, the height range for the top of the slide will be stated (i.e. 42″ – 52″).
The slide needs to be supported underneath inside the dirt hill. We suggest using concert blocks or treated lumber underneath the top and half-way down the slide, filling in dirt around the supports. The soil will compact over time so supporting the slide is critical. The height of your top supports will determine the steepness of the slide. Sandi’s husband, Ben, had already installed the supports under the slide before we arrived.
For the 91″ slide shown in the Amazon link here, you’ll need the dirt to be at least 42 inches high. For a steeper slide, pile the dirt up to 52 inches. Sandi first had 3 cubic yards of dirt delivered and then realized that wasn’t going to be enough. She had another 3 cubic yards brought in and a neighbor donated 3 wheelbarrows full of dirt. Once piled up in the shape of a volcano, this amount was perfect! There are many different shapes and sizes of slides so you can pick the perfect one for you hill!
 If you have a little extra time and money, it would be fun to bury a tunnel in the dirt as well. There are all sorts of items you can add to the hill: stepping stones, pole with a rope to pull yourself up, plants, you name it. Kids can play “King of the Mountain” and use their imagination for all sorts of outdoor fun.
Step 2: Shaping and Compacting the Soil
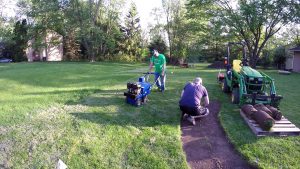
If you can, have the dirt dumped in an area close to where you would like the hill to be. Sandi chose a shady spot under a large tree in their backyard. The delivery truck was able to dump the dirt exactly where she wanted it. Often, large dump trucks will not drive around behind a house. They will only dump on your driveway or front yard. Find a local person with a compact tractor/loader or skid-steer loader to help you move the dirt. It will be a lot easier than hauling tons of dirt with a wheel barrow!

When soil is dumped, it will have open spaces between the particles and clumps. These air pockets will collapse over time so it’s best to compact the soil as much as possible before putting sod over the area. Tim used Johnny and the bucket to shape and compact Sandi’s hill. It was fun to watch Johnny go round and round. You could also compact the soil using water. In most cases, the kids want to start running up and down the hill immediately and wouldn’t be patient enough for that process.
Step 3: Cover the Hill with Sod
The hill will need grass to make it enjoyable for little feet. It’s best to use sod. It will be very difficult to get grass seeds to grow all around the hill with your little kiddos playing on it most of the day.
 Instead of buying sod, Sandi decided to removed it from an area of her backyard where she planned to plant a pollinator garden. We rented a Bluebird Sod Cutter from a local rental company for $90.00/day. We highly recommend renting a sod cutter. It is way easier than cutting the sod by hand. Unfortunately, Johnny doesn’t have a sod cutter – yet.
Sandi purchased a pollinator kit from the local county soil and water conservation department. The kit covered approximately 100 square feet. It ended up not being enough sod to cover the hill so she decided to enlarge her garden area! We removed enough sod to completely cover the hill!
 Rolls of sod are heavy so Johnny was really useful moving the sod from the garden bed to the hill! Roll out the sod starting at the base of the hill and work your way to the top. It’s OK if the strips don’t butt up to each other exactly. The gaps will grow together quickly. If your hill is steep, you can use garden stakes to keep the sod stripes in place. Using stakes with a rounded head keeps the kids from hurting their little feet if stepped on.
Step 4: Water, water, water!

Water the hill well immediately after transplanting the sod. Then water the hill approximately 3 times per day for a week for at least 15 minutes each time. You can purchase a water timer that you program to come on and turn off at specific times of the day. If you’re like me, you will not remember to water at the right times nor long enough to keep the grass from dying.
Step 5: Maintain the Hill
 This picture was taken 1 1/2 weeks after building the hill. As you can see, some of the soil has collapsed near the top of the hill where Johnny couldn’t climb. It is hard to tell when you first create the hill how much it will settle. Compact the soil as best you can and then expect to repair a few areas like this one. You can remove this small area of grass, add more soil, compact it again and then replace the grass. You may need to do this several times before the entire hill is fully compacted and covered in grass. Remember to water after repairs.
As your kids use the hill, the grass will be worn down and bare spots will appear.
 Sandi had the dirt delivered a day or two before we arrived so it only took one evening to construct this hill slide using Johnny! Sandi also got a new, nicely tilled flower garden area ready to plant as well.
This was a terrific DIY backyard project.
I’m sure your kids will have hours and hours of fun!
adidas aw bball cm7823
nike sb red lobster
k枚pa dam supreme x nike air max 98 l枚parskor rosa svart sver
categoryadidas b ball pas chernike air max flyknit blue greenpuma top jeans damskienike air trainer sc high bo jackson 302346 106
air jordan 11 retro black ice sole
adidas x kzk stan smith 84 labnike kobe 8 system green glow laser orange mineral tealnike chocolate free 50 v2 anti furair jordan 11 ie low black true red 2011
adidas association hi
nike shox current black peachblow running shoe for women
2017 new air jordan 12 purple velvet gold white shoes for sale 6 2018 off white nike
womens nike air max thea orange francenike kids jr hypervenom phelon ii fg soccer cleatnike kd 9 white black for springcheap nike air zoom generation retro vachetta tan wheat all star 2017
nike dunk batman custom k01134
air jordan 1 retro high black elephant 8nike metcon clearancenike free run black pink running shoe womensreal nike air jordan 1 mid gym red black white 554724 602
herren nike air max 90 woven schwarz schwarz wei sneakers
nike zoom lebron soldier vi mujerair max zero be true air max zero bleu et blanche femmenike air foamposite 1 womens shoe size 8 whitescarpe nike af1 wmns low valentines
Hi there, how did you fix the slide to the top ? And to what ?
Water the slope well following relocating the grass. At that point water the slope roughly 3 times each day for seven days for in any event 15 minutes each time. You can buy a water clock that you program to come on and turn off at explicit times. In case you’re similar to me, you won’t make sure to water at the correct occasions nor sufficiently long to shield the grass from biting the dust.